Why Mounting Backblaze B2 on Windows Is a Smart Move
Backblaze B2 is cheap, durable cloud storage — but it's designed for backups and apps, not for browsing. Mounting fixes that: OurClone exposes your B2 bucket as a drive through WinFsp, so you can open, edit, and drop files into B2 straight from File Explorer, with files streamed on demand instead of downloaded in bulk.
- 🧩 Native File Explorer Integration — Your B2 bucket shows up as a regular drive in "This PC", so every Windows app can read and write files directly.
- 💾 No Bulk Downloads — Mounting streams files on demand, so even a multi-terabyte bucket only spends local disk on the files you actually open.
- 💰 One of the Cheapest Clouds to Mount — Backblaze B2 stores data at around $6/TB per month, with free egress up to a generous multiple of your stored data — ideal for archives.
- 🛡️ Read-Only Mode for Safety — Mount read-only when you only need to browse or pull, and Windows will block any accidental write or delete.
- 🔌 S3-Compatible Under the Hood — OurClone connects to B2 through its S3-compatible endpoint, so setup is the same access-key flow you'd use for any S3 store.
How Mounting a Cloud Drive Works (and Why It's Different from Sync)
Syncing a bucket means copying every file down to your disk and keeping both sides in lockstep — fine for small buckets, painful for big ones.
Mounting takes the opposite approach. OurClone presents your B2 bucket as a virtual filesystem through WinFsp — the folder structure is visible immediately, but file contents are only fetched when you actually open something. Recently used files are cached locally so the second open is instant, and writes are uploaded back to B2 in the background.
OurClone makes both the polling interval (how often it checks B2 for changes) and the maximum cache size configurable, plus a read-only switch for extra protection against accidental writes.
- 🚀 Stream files on demand — no need to download the whole bucket
- 💾 Saves PC disk space by caching only what you actually open
- 🔁 Two-way access — edits in the mounted drive upload back to B2
- 🛡️ Read-only mode prevents accidental writes when you only need to browse
What to Know Before You Mount Backblaze B2
A few minutes of planning before you click Mount will save you from cleaning up a messy mount point later.
- 🧩 Install WinFsp First — Mounting on Windows relies on WinFsp (Windows File System Proxy), a free, open-source driver that lets OurClone expose your bucket as a real Windows volume. Install it once before your first mount — without it, the mount won't start.
- 🔑 Create an Application Key — In your Backblaze account, create an Application Key (keyID + applicationKey). OurClone uses these as the Access Key ID and Secret Access Key for B2's S3-compatible endpoint.
- 📁 Pick the Right Mount Source — Mount a specific bucket, or a prefix inside it (like
my-bucket/photos), for focused access. A narrower source is faster to list. - 🖥️ Choose a Sensible Local Mount Point — Point the mount at a dedicated, empty folder like
C:\CloudMounts\B2. Don't aim it at your Desktop or any folder that already has files. - 🔒 Read-Only vs Read-Write — Read-only is the safer pick for archives; pick read-write to upload, edit, or delete. Read-only mode literally cannot upload — Save dialogs will fail.
- ⏱️ Mind the Polling Interval — Each poll lists objects, which counts as B2 transactions. A longer interval keeps costs down on large buckets.
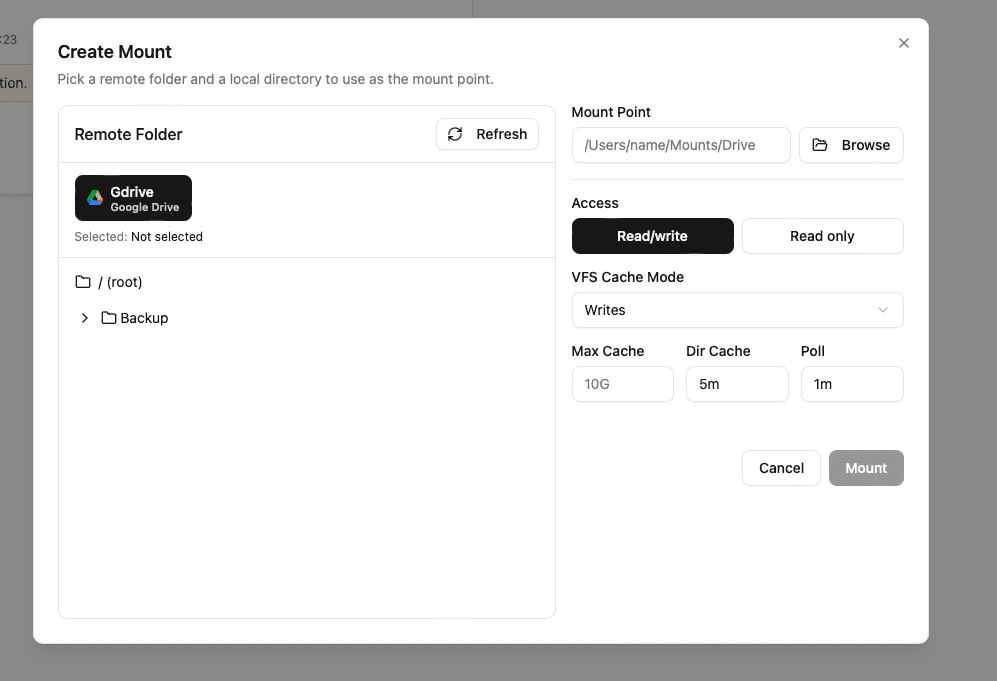
How to Mount Backblaze B2 on Windows with OurClone
Once WinFsp is installed, OurClone makes mounting B2 on Windows straightforward. Step 1 connects your bucket with an application key — and from there you're a few clicks away from a File Explorer-ready drive.
- 🔐 Connect to Backblaze B2 via Application Keys — Open OurClone and go to
Add Storage. Choose Backblaze B2 from the S3 provider list, then fill in a Remote Name and your application key's keyID (as Access Key ID) and applicationKey (as Secret Access Key), created in the Backblaze B2 console. OurClone uses B2's S3-compatible endpoint automatically. Once verified, B2 will appear as a connected storage backend. - 📂 Open the Mount Tab and Click New Mount — Once B2 is connected, go to the
Mounttab in OurClone. Click the New Mount button in the top-right corner to open the mount configuration dialog. - ⚙️ Configure the Mount Settings — In the dialog, pick Backblaze B2 as the authorized source. Choose what to mount — a specific bucket or a prefix inside it (e.g.,
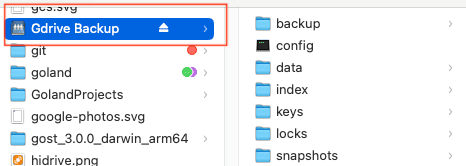
my-bucket/photos). Then pick an empty local folder as the mount point (something likeC:\CloudMounts\B2). Choose Read-only if you just want to browse, or Read-write if you need to upload and edit. Optionally tweak the polling interval and max cache size. Click Mount to finish. - 🗂️ Use Your B2 Mount Like a Local Drive — Open the mount point in File Explorer (it appears under "This PC" as a mounted volume). Windows now treats it as a real drive — browse, open, create folders, drag in files, and delete just like any local folder. Create a new
backupfolder, drop in a few files, and OurClone uploads them to B2 in the background. - ✅ Confirm the Sync on Backblaze B2 — Switch back to OurClone and open your B2 storage from the file browser — your new
backupfolder and uploaded files should already be listed. For extra peace of mind, open the Backblaze B2 console and confirm the files appeared in your bucket too.

The combination of B2 application keys, WinFsp, and OurClone's mount engine gives you a bucket that genuinely feels like a local drive on Windows — cheap, durable storage you can browse like any folder.
Getting the Most Out of Your Backblaze B2 Mount
A live mount is convenient, but an object store behaves differently from a synced folder. Keep these in mind once your B2 mount is up and running.
- 🔁 Edits Upload Both Ways — Anything you add, rename, or delete in the mounted drive is applied to your bucket. Changes made elsewhere appear after the next poll cycle.
- 🛑 Read-Only Means Read-Only — If you mounted read-only, uploads and Save dialogs will fail. Remount as read-write to enable writes.
- 💸 Watch Transaction Costs — Listing and downloading files count as B2 transactions and egress. A longer polling interval and a healthy cache keep costs predictable.
- 💽 Cache Lives on Your PC — Recently opened files are cached locally for speed. If your PC is low on disk space, reduce the max cache size.
- 🔌 Unmount Cleanly Before Shutdown — Before shutting down or signing out, click Unmount in the Mount tab to release the volume cleanly.
When Your Mount Stops Working
Most mount failures trace back to one of a few causes: WinFsp isn't installed (or needs a reboot after install), a revoked or deleted application key, a key scoped to the wrong bucket, or a mount point that's no longer empty. If your B2 mount refuses to start, first confirm WinFsp is installed, then re-check your application key under Add Storage, and remount.
Verify the Sync Anytime
Any time you're unsure whether something made it up to the cloud, open your B2 storage view inside OurClone's file browser, or open the Backblaze B2 console directly. Whatever File Explorer shows in your mount point should match.