Why Backing Up Your macOS Folders to Proton Drive Makes Sense
Unexpected file loss happens — a faulty update, a broken Mac, or simply accidental deletion. Backing up your important folders to Proton Drive means you're protected, with your data stored safely in the cloud and ready to restore when needed.
- 🔐 Private by Design – Your files stay yours. Proton Drive encrypts everything on your Mac before anything is uploaded, including names and metadata — even Proton can't read your data.
- 🖥️ Mac-Friendly Setup – The Proton Drive app fits right into Finder, letting you drag folders into the cloud just like you'd move them between local folders. No steep learning curve required.
- 🌍 Strong Legal Protection – Operating under Swiss privacy laws, Proton Drive is built in a country that takes digital rights seriously, unlike many other cloud providers.
- 📁 Custom Backups – You’re in control. Whether it’s your Documents folder, a client project, or your photo archive, choose exactly what to back up and when.
- 🕒 Recover What Matters – Mistakenly replaced or deleted a file? You can go back in time and recover earlier versions without needing to dig through a trash folder.
What Is Incremental Backup and Why Does It Matter?
When it comes to backing up your macOS files, doing a full backup every time isn’t always practical — it takes time, bandwidth, and storage. That’s where incremental backup comes in. Instead of uploading everything again, it only saves the changes made since the last backup.
This method is faster and far more efficient, especially when working with large folders or media-heavy projects. It ensures your backups stay up to date without constantly transferring gigabytes of unchanged data.
Tools like Rclone and OurClone support incremental backups to Proton Drive, meaning you can automate the process while keeping your files encrypted and versioned. Whether you’re editing video, managing design files, or just want your Documents folder protected — incremental backup helps you save time without compromising on safety.
- 🚀 Speeds up backup times by only syncing changed files
- 💾 Saves cloud storage space and bandwidth usage
- 🔐 Works with encrypted storage like Proton Drive for secure updates
- 📅 Allows versioning so you can access past edits when needed
What to Know Before You Start Backing Up
Before backing up your macOS folders to Proton Drive, it’s worth taking a few minutes to plan things out. A thoughtful setup helps ensure your files are safe, recoverable, and stored exactly the way you need them:
- 📁 Pick the Right Folders – Backups work best when you’re selective. Think about what truly matters — your
Documents,Photos,Desktop, or creative projects. Avoid cluttering your backup with system files or temporary data. - 📶 Make Sure Your Internet Can Handle It – Uploading large files to the cloud can take time. A stable connection with decent upstream speed (10 Mbps or more) will make your first backup far less frustrating.
- 🔒 Don’t Forget Security – Since Proton Drive encrypts your data, make sure you’re using a strong password and two-factor authentication. Losing access to your account can mean losing access to your backup.
- 🧪 Start Small – Try backing up a test folder first. This lets you check that everything is uploading as expected and that restoring files works smoothly — no surprises when it really matters.
- 📦 Know Your Backup Strategy – Full backups copy everything each time, which can be slow. Incremental backups only upload what’s changed, saving time and space. Choose the method that fits your needs and schedule.
How to Back Up macOS Folders to Proton Drive Using OurClone
OurClone makes backing up to Proton Drive simple, even for users who don’t want to deal with command-line tools. Here’s a step-by-step guide to setting up an encrypted, cloud-based backup from your Mac to Proton Drive using OurClone.
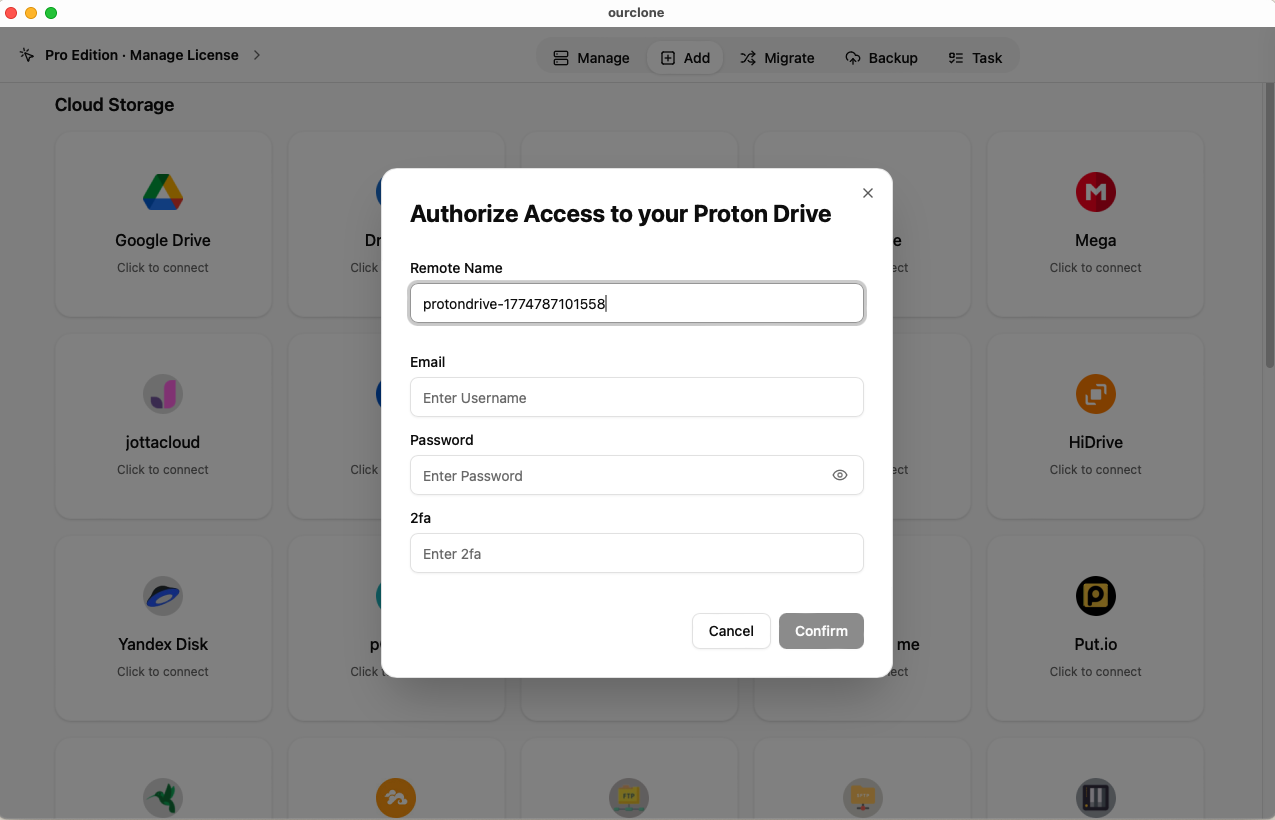
- 🔗 Add Proton Drive as a Storage Repository – Start by adding a remote storage destination. OurClone supports many cloud services, including Google Drive, OneDrive, S3-compatible storage, and of course Proton Drive. Choose Proton Drive, and the app will walk you through the authorization process in your browser. Once approved, the cloud storage will appear in your account.
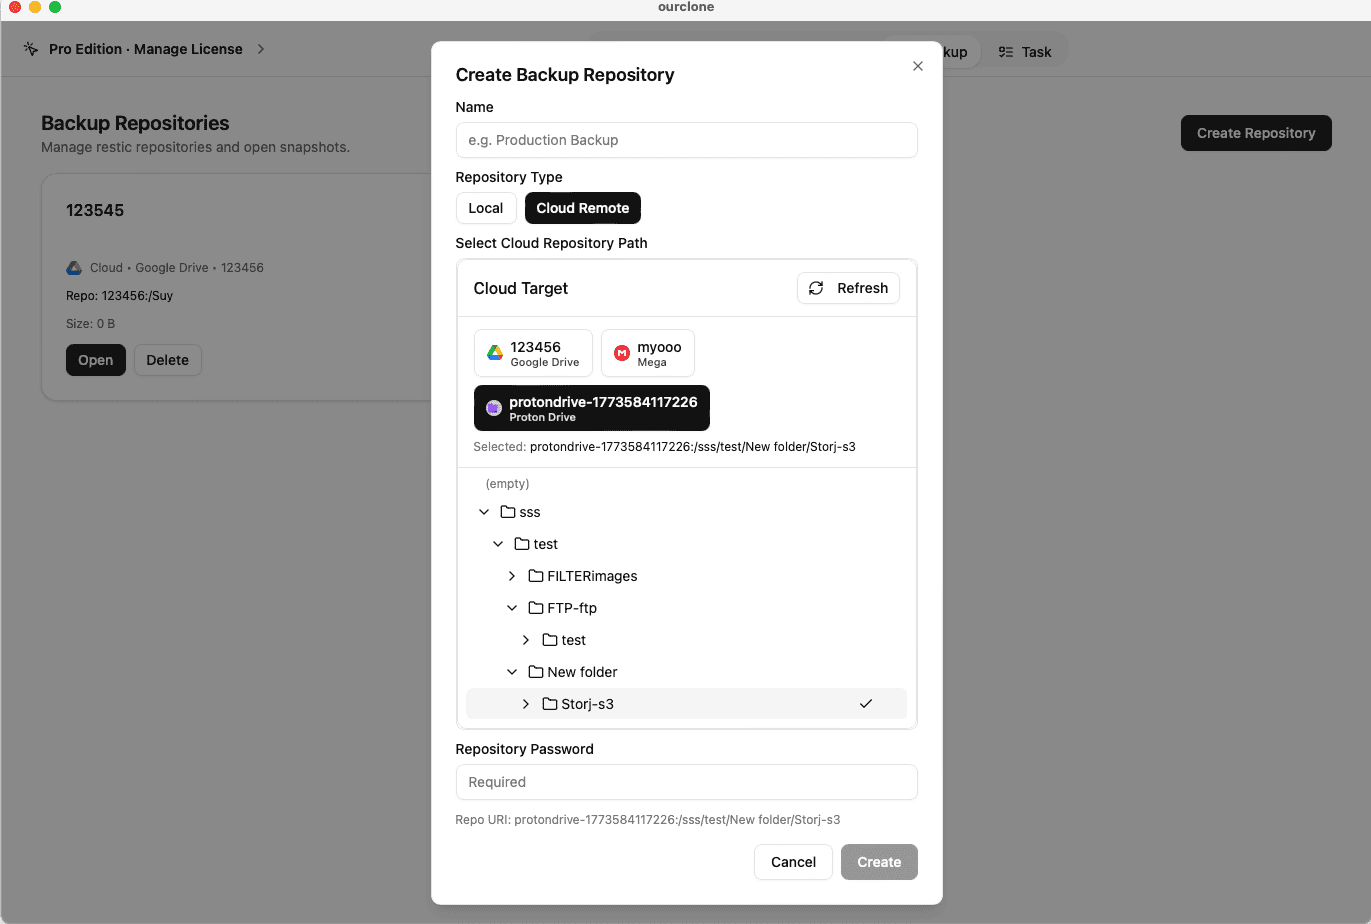
- 📦 Create a Backup Repository – Click the
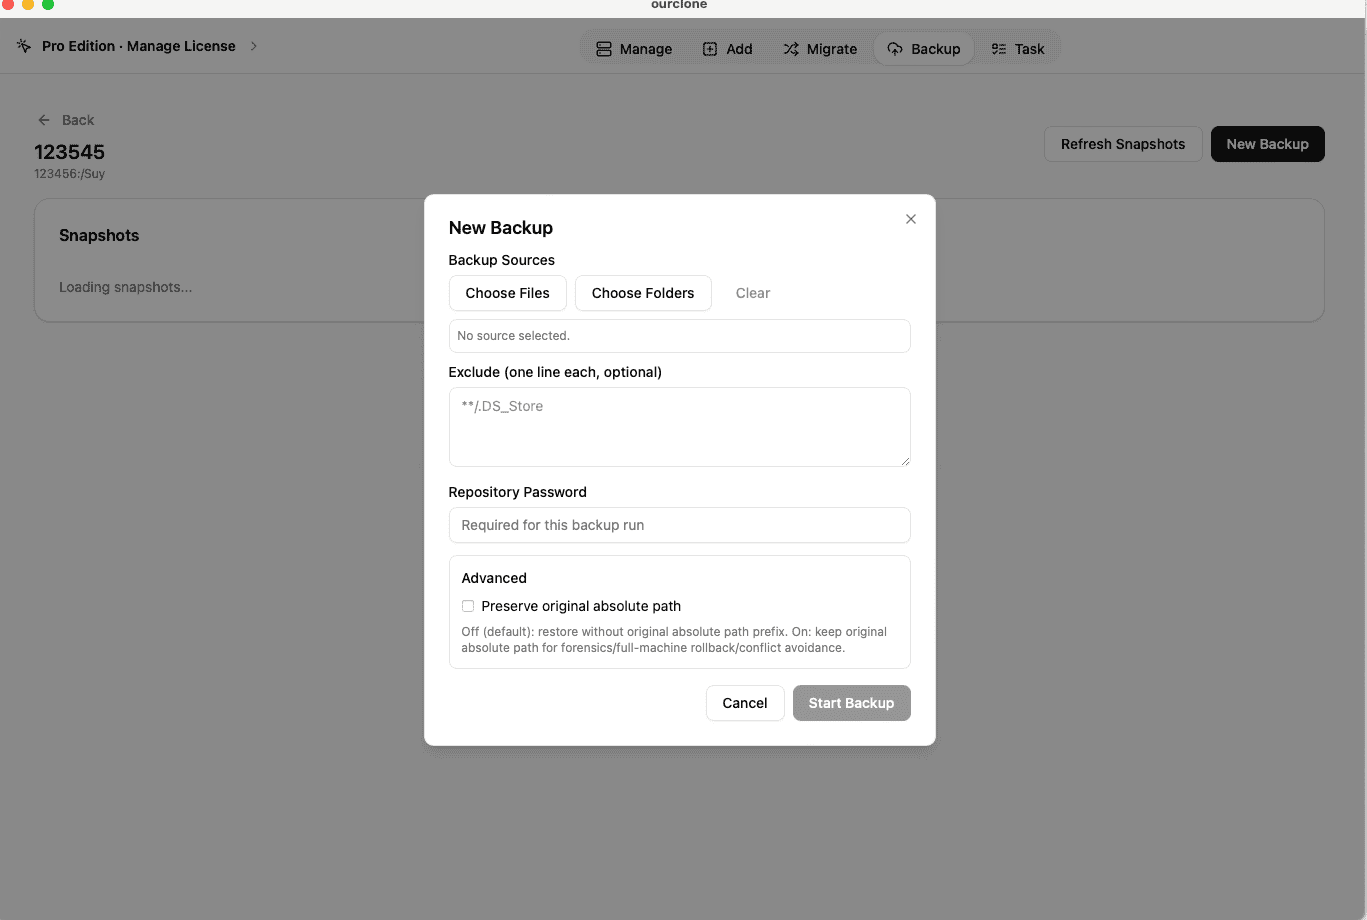
Backuptab in the sidebar to open the backup interface. If no repository exists yet, you'll need to create one. Select a folder on your Proton Drive (e.g.,/backup) to act as your repository. Give it a name and set a password — this password encrypts the backup, so don’t lose it. ClickCreateto finish. - 🗂️ Start Your First Backup – Open the newly created repository and click
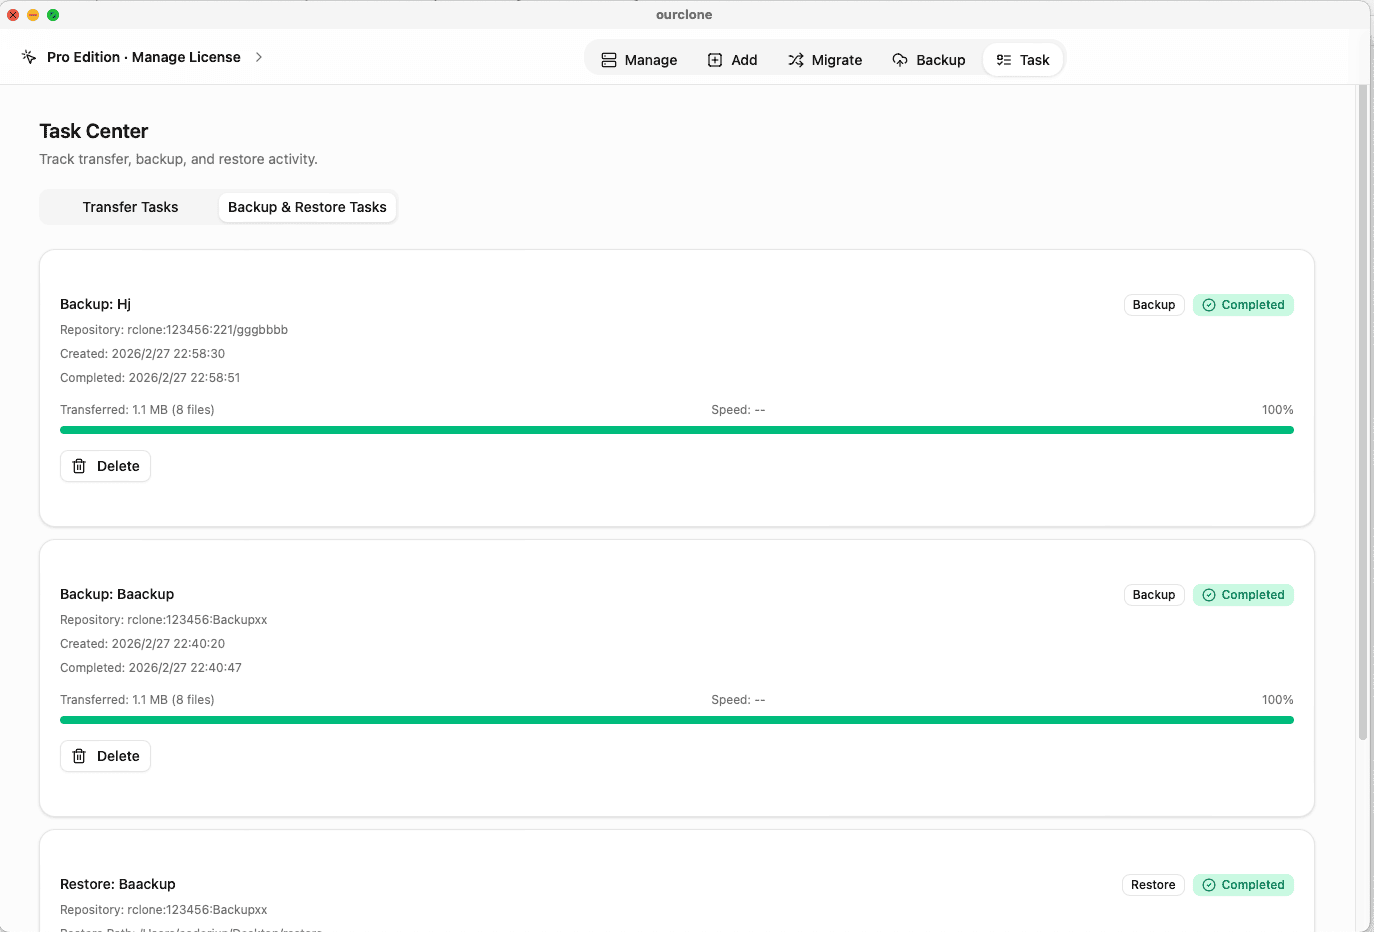
New Backup. Pick one or more folders on your Mac that you want to back up — like~/Documentsor~/Projects— and hitBackup. OurClone will start backing up the data in the background. - 🕒 Track Progress in the Task Manager – Head over to the
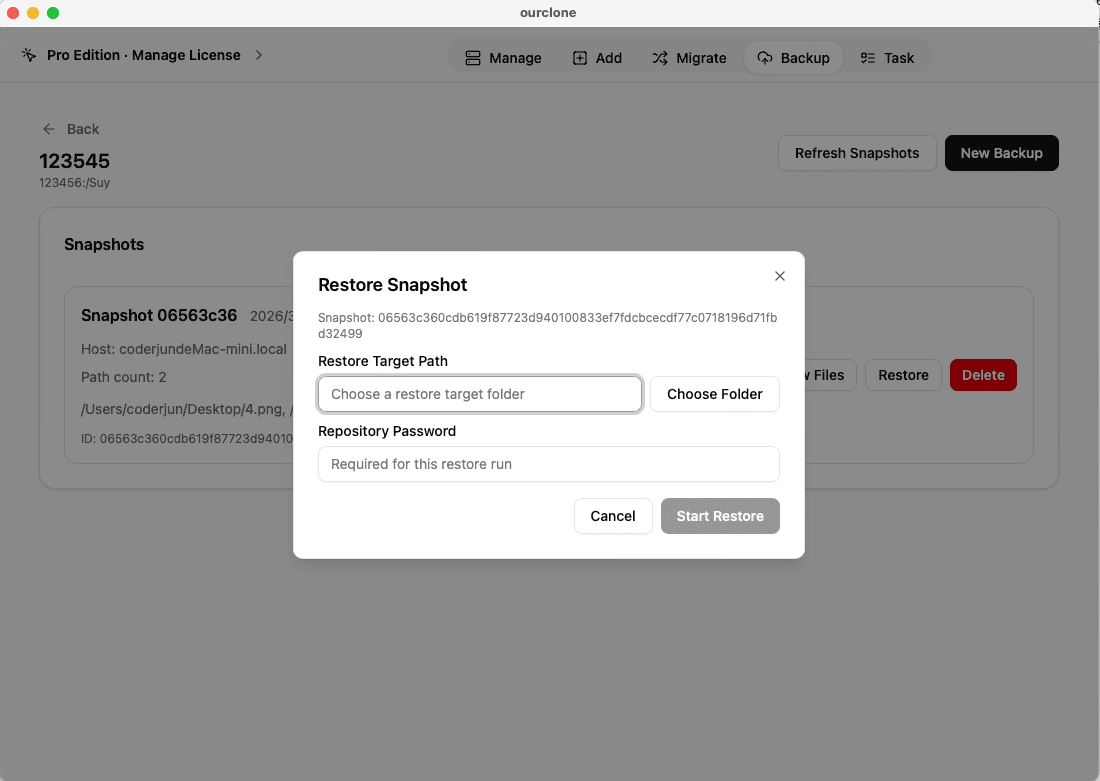
Tasksection. UnderBackup Task, you can see the backup in progress or check completed tasks. Files are uploaded in chunks and encrypted, making the backup fast and secure, even for large files. - 🔁 Restore Files Securely – To restore files from a backup, open the repository and locate the backup record you want to recover. Click
Restore. Since OurClone uses encrypted backups, you'll be prompted to enter the repository password. After that, choose a destination folder on your Mac — the files will be decrypted and restored there automatically.
With block-level encryption and resumable uploads, OurClone ensures that your macOS backups are efficient, secure, and always recoverable — even if your connection drops or your device goes offline.
How to Confirm Your Backup in OurClone
After setting up a backup task in OurClone, taking a few moments to verify that your data is truly safe is a smart habit. OurClone offers clear visibility into each step of the process, so you don’t need to rely on guesswork or technical tools.
- 📄 Check Task Completion – Go to the
Tasksection and look underBackup Task. If the status shows as completed without warnings, you’re good to go. Errors or failed uploads will be flagged clearly. - 🧩 Review File Results – If any files were skipped or encountered issues (such as locked permissions or access errors), you’ll see a notice in the task logs. This lets you troubleshoot right away without redoing the whole backup.
- 📜 Use the Detailed Logs – Click into any backup task to view its full log. You’ll find information on which files were backed up, their sizes, and whether they were newly uploaded or unchanged.
- 🔐 Encrypted Repository Checks – Since OurClone encrypts all backup data before uploading, part of the verification involves ensuring that each encrypted block is stored properly and is associated with the correct backup record.
Regularly Check That Backups Are Still Running
It’s easy to forget a scheduled backup exists — until you need it. Make it a habit to open OurClone once in a while and confirm that your scheduled tasks are still executing as expected. A failed login, expired token, or moved folder could quietly interrupt future backups without you realizing.
Test a Restore — Even If You Don’t Need One Yet
Don’t wait until something goes wrong to learn how the restore process works. Choose a small, unimportant folder and run a restore from a completed backup. This helps confirm two things: that your backups are actually restorable, and that you still remember your repository password — which is required for all encrypted restores.