Advantages of Cloud Storage Services
Modern cloud storage services offer far more than just space — they deliver reliability, security, and accessibility across platforms. Here are some standout benefits:
- 🌐 Access Anywhere – Instantly access your files across macOS, Windows, iOS, and Android using services like Dropbox, OneDrive, or Google Drive.
- 🛡️ Automatic Redundancy & Version History – Services like pCloud and Sync.com keep multiple versions of files and mirror your data across servers to protect against data loss.
- 🔐 Zero-Knowledge Encryption Options – Some platforms (like Tresorit and MEGA) offer client-side encryption for extra security, where even the provider cannot view your files.
- 📱 macOS & iOS Integration – iCloud Drive, Google Drive for Desktop, and Dropbox all offer seamless Finder access, Spotlight indexing, and automatic photo syncing from your iPhone.
- 💾 Storage Efficiency & Collaboration – Many providers offer smart sync (files on-demand), plus real-time team collaboration tools like Microsoft 365 or Google Workspace integration.
Why Back Up macOS Files to the Cloud?
While Apple’s Time Machine offers solid local backups, it doesn’t protect against disasters like theft, fire, or drive failure. Cloud backups fill that gap with offsite redundancy.
According to Backblaze, hard drives have an annual failure rate of around 1–2%. Combine that with increasing ransomware and accidental deletions, and the need for secure, automated cloud backups becomes critical.
Additionally, many macOS users store large libraries of creative work (e.g., Photos, Final Cut Pro, Logic projects) that deserve long-term protection — beyond a single physical device.
- 🔥 Protect against fire, flood, theft, and disk failure
- ☁️ Enable recovery from anywhere — even without your Mac
- 🔄 Avoid total loss during macOS upgrades, migrations, or formatting
What to Know Before You Begin
Before setting up cloud backup on your Mac, be sure to plan carefully to ensure data integrity and performance:
- 📁 Identify Critical Data – Prioritize key folders like
Documents,Photos,Desktop, and app-specific libraries (e.g., Mail, Notes). - 📶 Ensure Stable Internet – A minimum of 10 Mbps upload speed is recommended for smooth initial backup, especially for large media libraries.
- 🔐 Set Strong Encryption Passwords – If your service offers end-to-end encryption (like MEGA or Backblaze), use a strong, unique passphrase and store it safely.
- 🧪 Run a Test Backup – Back up a small folder and test restore functionality to validate both speed and reliability before committing your entire system.
- 🕑 Schedule It – If using tools like OurClone or restic, set a recurring schedule to ensure automatic daily or weekly protection.
Method 1: Manual Upload to Cloud Storage
This method involves manually copying files to your preferred cloud storage platform, such as Google Drive, OneDrive, or Mega. It requires no additional software but can be time-consuming for regular backups.
Step-by-Step Guide
Step 1: Organize Your Files
Before uploading, organize the files or folders you want to back up. Create a dedicated “Backup” folder on your Mac to keep things tidy and reduce confusion later.
Step 2: Open Cloud Storage in Browser or App
Launch your cloud storage — for example, open Google Drive in your browser or use the official OneDrive or Mega app if installed.
Step 3: Drag and Drop Files
Navigate to your preferred folder in the cloud storage and drag-and-drop your files or folders from Finder into the upload area. Wait for the upload to complete.
Step 4: Verify Upload Completion
Ensure the upload finished successfully. Some services offer upload progress bars or confirmation messages. It's also good practice to check if the file sizes match.
Optional: Use Desktop Sync Clients
For convenience, you can install cloud sync apps (e.g., Google Drive for Desktop) to automatically mirror files placed in designated folders. However, these do not offer encryption or versioning like dedicated backup tools.
Pros
- ✅ Easy to start, no additional software required
- ✅ Immediate visual confirmation of uploaded files
- ✅ Works with any modern browser or official cloud apps
Cons
- ❌ No incremental or scheduled backups
- ❌ No encryption or compression options
- ❌ Manual effort required every time
- ❌ Human error risk — overwriting or skipping files
Method 2: Backup with OurClone (Recommended)
OurClone is a powerful desktop backup solution for macOS that supports 30+ cloud providers including Google Drive, OneDrive, pCloud, S3, Mega, and more.
Why Choose OurClone?
🧠 Incremental Backup
OurClone uses a highly efficient incremental backup strategy. Rather than re-uploading all files each time, it detects and backs up only the parts of files that have changed. This block-level backup approach drastically reduces bandwidth usage and backup time, especially for large files or frequent changes.
🔁 Deduplication
OurClone identifies and eliminates redundant data during backups. If identical data blocks are found in multiple files or versions, they’re stored only once, significantly reducing overall cloud storage usage and accelerating the backup process.
🔐 AES-256 + Poly1305 Encryption
All backup data is encrypted locally using industry-standard AES-256 encryption, combined with Poly1305 authentication. This ensures that your files are unreadable without your password — even the storage provider can't access your data. You retain full control over your data’s privacy and security.
☁️ Multi-Cloud Support
OurClone natively supports over 30 cloud providers and storage backends, including Google Drive, OneDrive, Dropbox, Amazon S3, Backblaze B2, and WebDAV. Through its integration with restic and rclone, it can also connect to virtually any custom or enterprise cloud storage, giving you maximum flexibility.
Step-by-Step: How to Back Up with OurClone
Step 1: Add a Cloud Storage
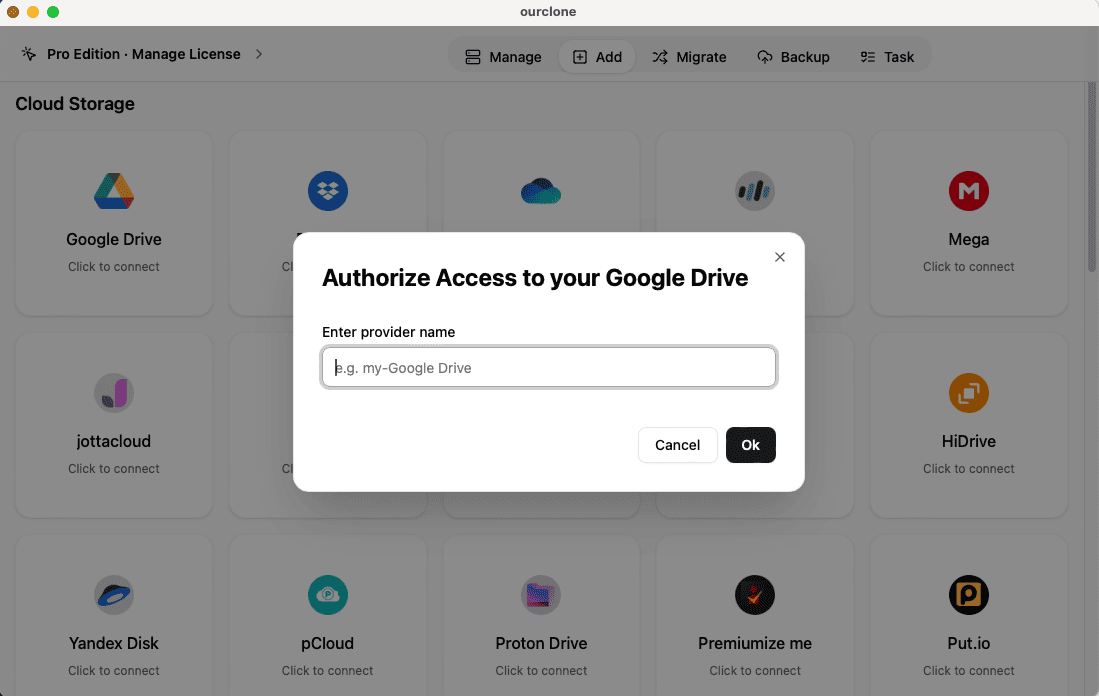
Open OurClone and choose a cloud storage provider to connect — you can pick services like Google Drive, OneDrive, or even AWS S3. In this example, we'll select Google Drive. OurClone will open a web authorization page. Once you've granted access, the cloud storage will be added successfully.
Step 2: Create a Backup Repository
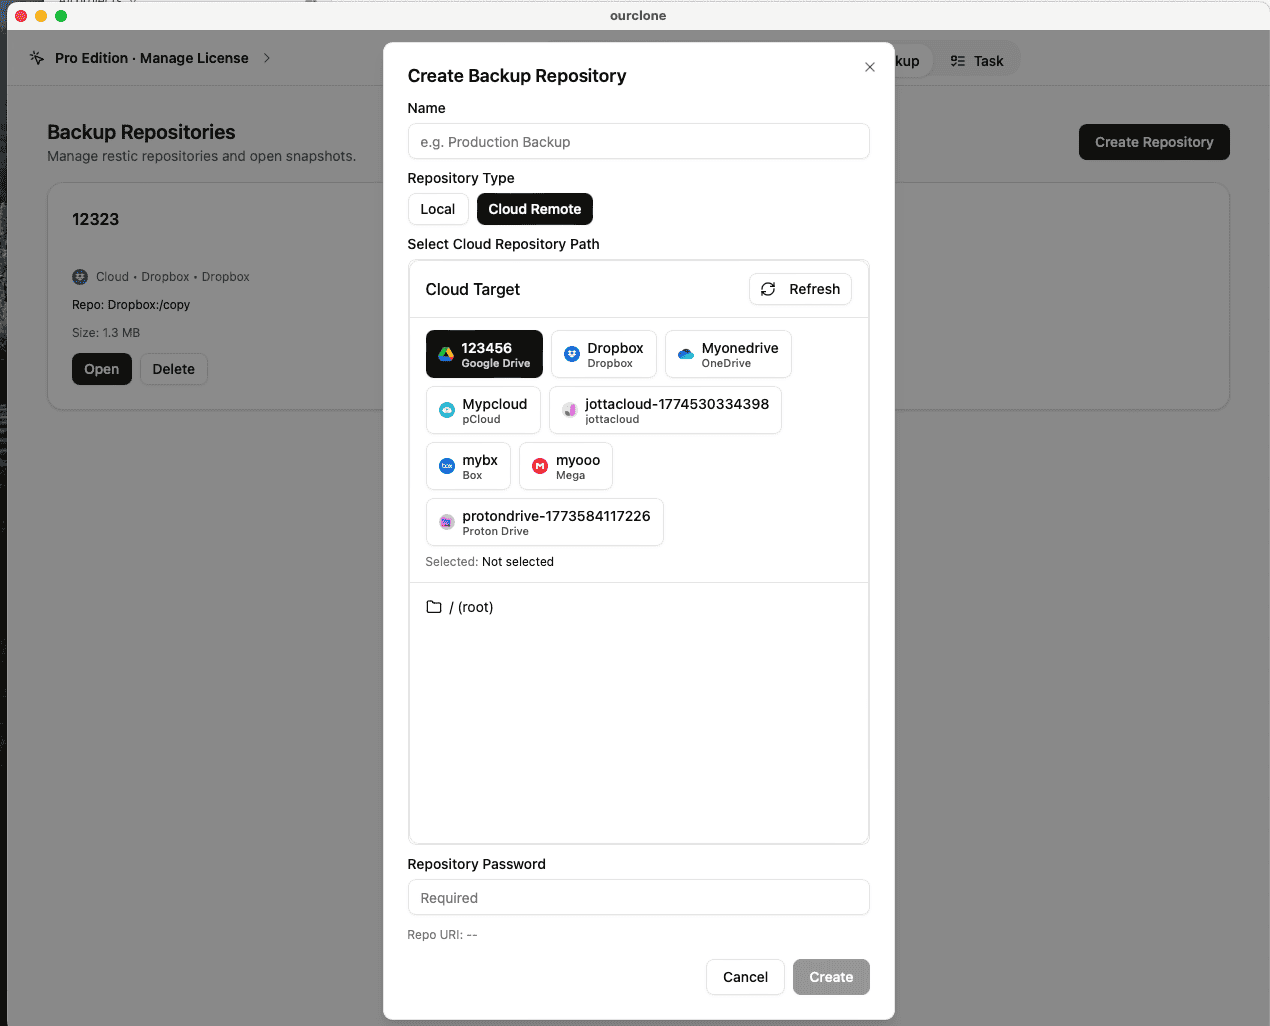
Click on the Backup tab to enter the backup page. If no repository exists yet, you’ll need to create one. Select a directory in your connected Google Drive — for example, the backup folder — to be used as your repository. You can also create a new folder if preferred. Then set a secure password and a display name for the repository and click Create.
Step 3: Add a Backup Task
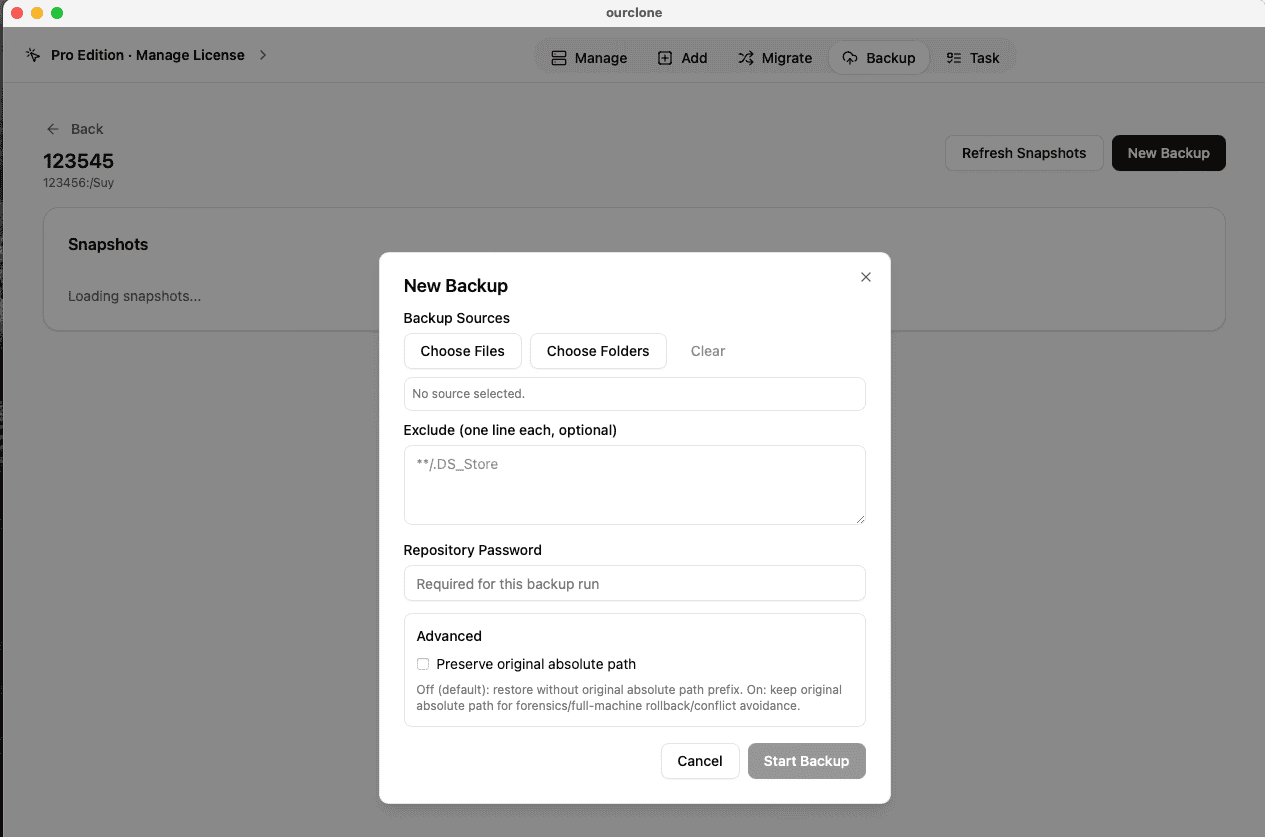
Enter the newly created repository. Click New Backup to create a backup task. Choose the files or folders on your Mac that you want to back up. Once selected, click Backup to start the process.
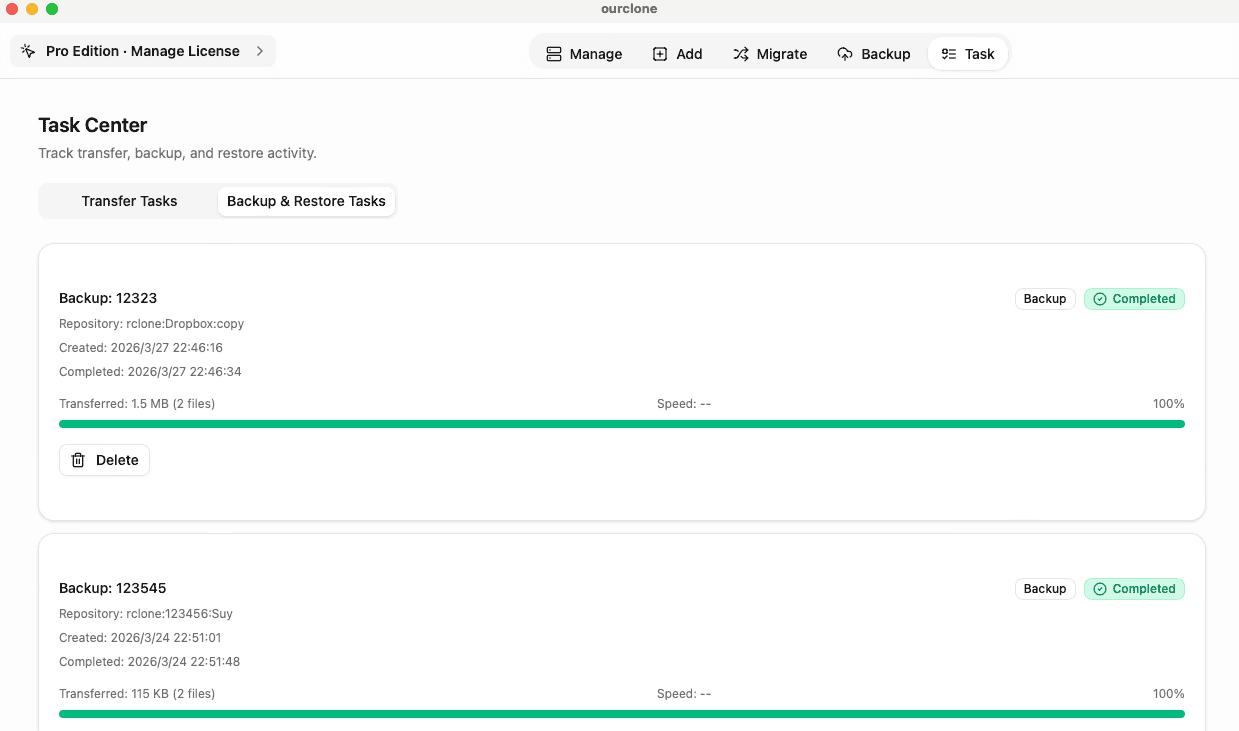
Step 4: Monitor Task Progress
Go to the Task tab and locate the Backup Task you just created. Here, you can monitor the progress in real time. When the task completes, your files are stored in the cloud using block-level backup technology.
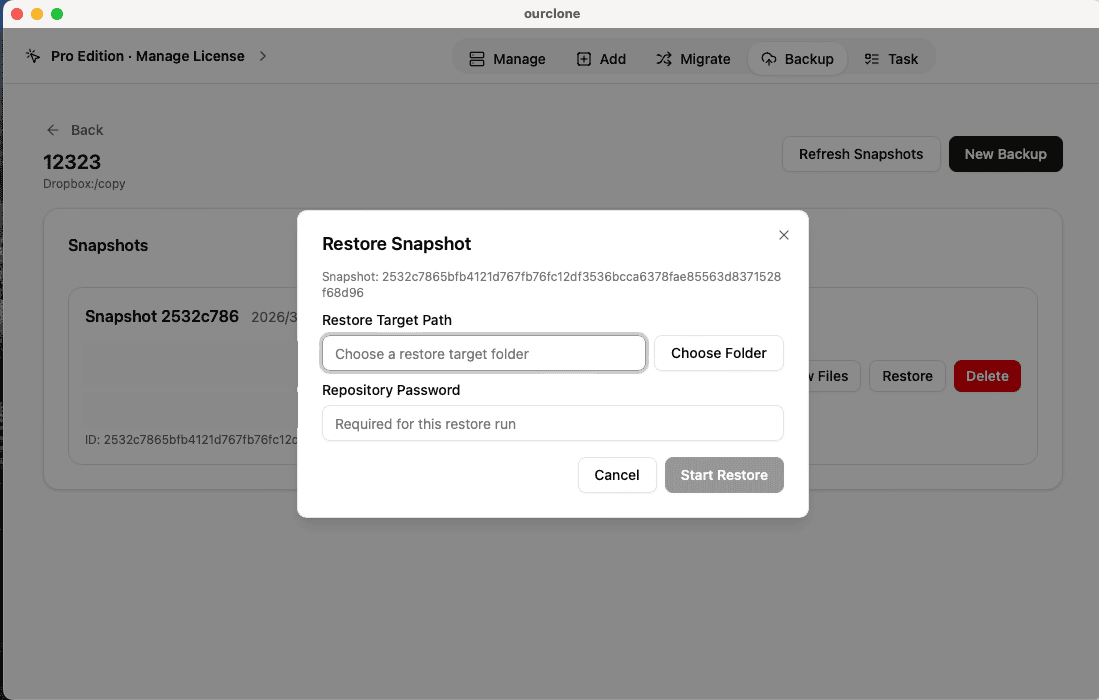
Step 5: Restore Files
If you want to restore your files back to macOS, open the repository, locate the backup record you need, and click Restore. The selected data will be recovered directly to your local system.
Comparison Table
| Feature | Manual Upload | OurClone |
|---|---|---|
| Automation | No | Yes |
| Incremental Backup | No | Yes |
| Deduplication | No | Yes |
| Encryption | Depends on provider | AES-256 + Poly1305 |
| Restore Capability | Manual | 1-click restore |
| Cloud Provider Support | Single Provider | 30+ Providers |