Why Backing Up macOS Folders to pCloud Is a Smart Move
You don’t think about backups until something goes wrong. Whether it’s a system crash, stolen laptop, or accidental file deletion—having a backup gives you options. pCloud offers a clean, reliable way to keep your macOS folders protected and available anywhere. It’s more than just cloud storage—it’s peace of mind built into your daily workflow.
- 🔐 Zero-Knowledge Encryption – With the optional pCloud Crypto add-on, you can encrypt sensitive files on your end, making them inaccessible to anyone else—including pCloud.
- ☁️ One-Time Payment Plans – Unlike other services that charge monthly, pCloud offers a lifetime plan—a one-time purchase for long-term use.
- 🧩 Integrated Finder Access – Once installed, pCloud Drive behaves like a local disk. You can drag and drop files just like you would with any other folder.
- 🔁 Automatic Backup – pCloud lets you select key folders (like Desktop or Documents) and back them up in real time, with no need to manage sync rules manually.
- 📱 Cross-Device Availability – Your files are instantly accessible on iOS, Android, Windows, and via web browser. A file saved on your Mac is right there on your phone, too.
How to Configure pCloud on macOS for Folder Backup
Getting pCloud set up on your Mac takes just a few minutes. Once installed, you can start backing up your most important folders with just a few clicks—no complicated setup or technical jargon.
- Head over to the pCloud download page and grab the macOS version of pCloud Drive.
-
Open the downloaded
.dmgfile and install the application by dragging it into your Applications folder. - Launch pCloud Drive and log in or create a new account. A new drive will be mounted in Finder under the name “pCloud”.
- Click the pCloud icon in the macOS menu bar and open Settings, then navigate to the Backup tab.
- Click Choose folder and select the macOS folders you'd like to automatically back up. Common choices include Desktop, Documents, Downloads, and Photos.
- Confirm your selections, and pCloud will begin syncing them to your account immediately in the background.
You’re done. From now on, any change you make in the backed-up folders on your Mac will be automatically reflected in your pCloud account—without lifting a finger.
Syncing Additional macOS Folders with Symbolic Links
By default, pCloud Drive only syncs files within its mounted virtual
drive. If you want to back up folders located elsewhere on your Mac—like
~/Projects or a folder on an external disk—you can use
symbolic links to include them without moving them manually.
Open Terminal and run the following command to create a symbolic link pointing from your pCloud Drive to the folder you want to back up:
ln -s /Users/YourName/Projects "/Users/YourName/pCloud Drive/Projects"
This tells macOS to treat Projects as if it lives inside your
pCloud Drive. As a result, pCloud will recognize the link and sync the
content inside your target folder to the cloud—without physically
relocating it.
It's an elegant workaround for syncing custom paths, but it’s not bulletproof. Some third-party tools and macOS permissions may interfere with how symbolic links behave. Be cautious when linking folders that are managed by other sync apps or located on drives that disconnect often.
Additional Tips for Reliable pCloud Backups
- 📶 Stay Connected – During large backups, especially the first sync, a stable internet connection ensures that nothing gets stuck or half-uploaded.
- 🔐 Enable Crypto for Sensitive Data – For files you don’t want anyone else to access—not even pCloud—consider enabling pCloud Crypto. It offers zero-knowledge encryption.
- 🧪 Occasionally Verify Your Backup – Open pCloud on another device or through the web app and check that your files are actually synced and accessible.
- ⏱️ Use Scheduled Tools for Advanced Needs – If you're working with automation tools like rsync, Automator, or third-party backup utilities, you can script backups into your pCloud drive folder.
-
🧹 Avoid System Files – Don’t try to back up macOS
system directories like
~/Libraryor/System. Stick to user data such as Documents, Downloads, and personal media.
pCloud is more than just a Dropbox or Google Drive alternative—it’s a versatile platform that plays well with macOS. With smart folder selection, symbolic links, and optional encryption, you can tailor your backup flow to match your exact needs.
How to Back Up macOS Folders to pCloud Using OurClone
OurClone allows you to back up your macOS folders directly to pCloud using secure OAuth 2.0 authentication. You don’t need to copy tokens or fiddle with config files — just log in through your browser, grant access once, and start protecting your data in just a few clicks.
-
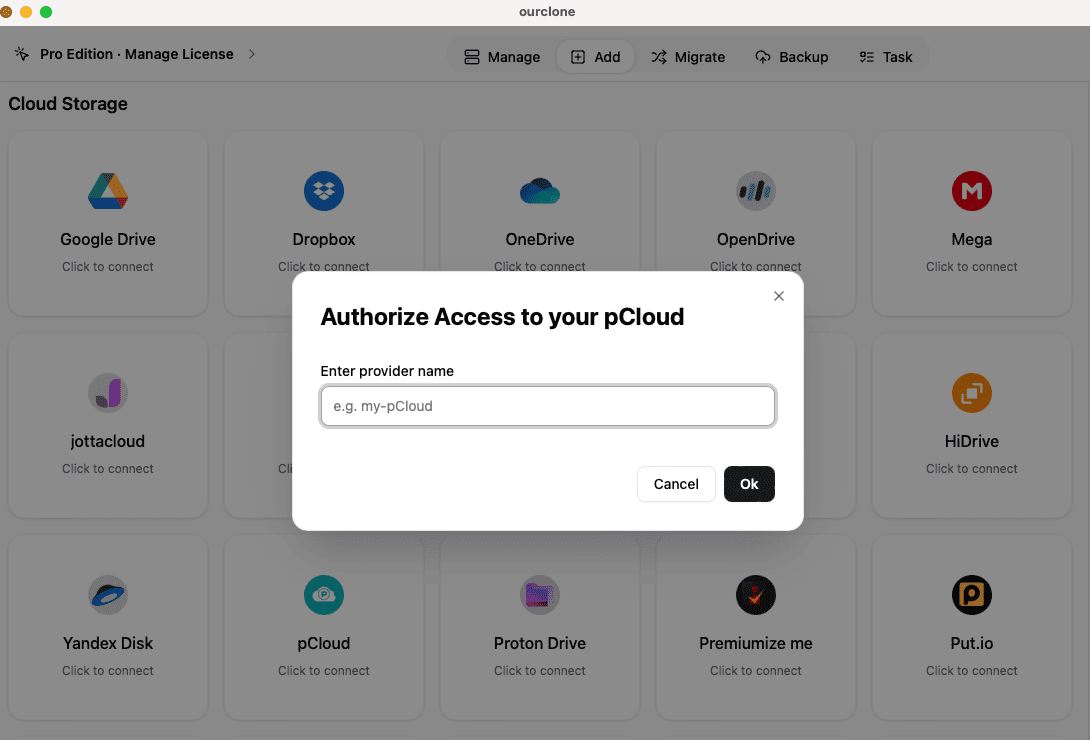
🔐 Connect pCloud via Browser Authorization – Begin by
opening OurClone and clicking
Add Storage. Choose pCloud from the list. A browser tab will open where you can sign in to your pCloud account and approve the permissions. Once done, pCloud will appear as a connected destination. -
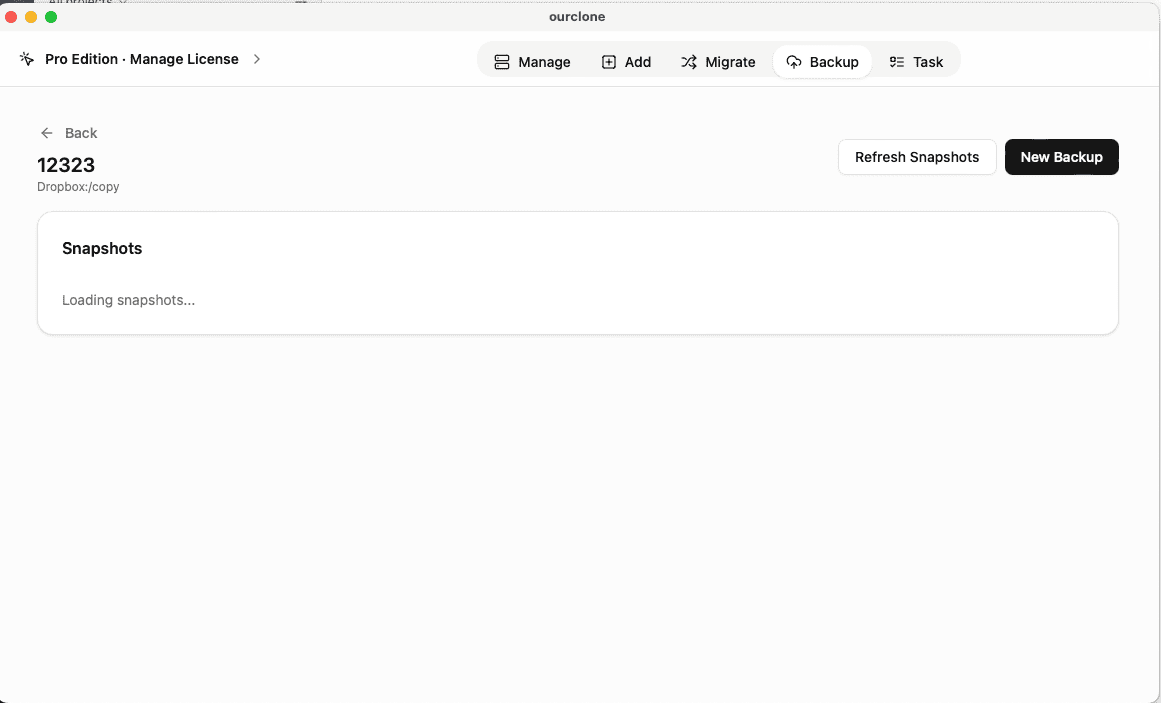
🗄️ Create a Backup Repository – Head to the
Backuptab and clickCreate Repository. Select a target path in your pCloud account, like/macos-backups. Give your repository a name and set a secure encryption password. This password will be required for future restores. -
📁 Pick the Folders You Want to Back Up – After
creating the repository, click
New Backupand select any local folders on your Mac. This includes typical folders like~/Documents,~/Photos, or even an external volume. Confirm and start the backup process. -
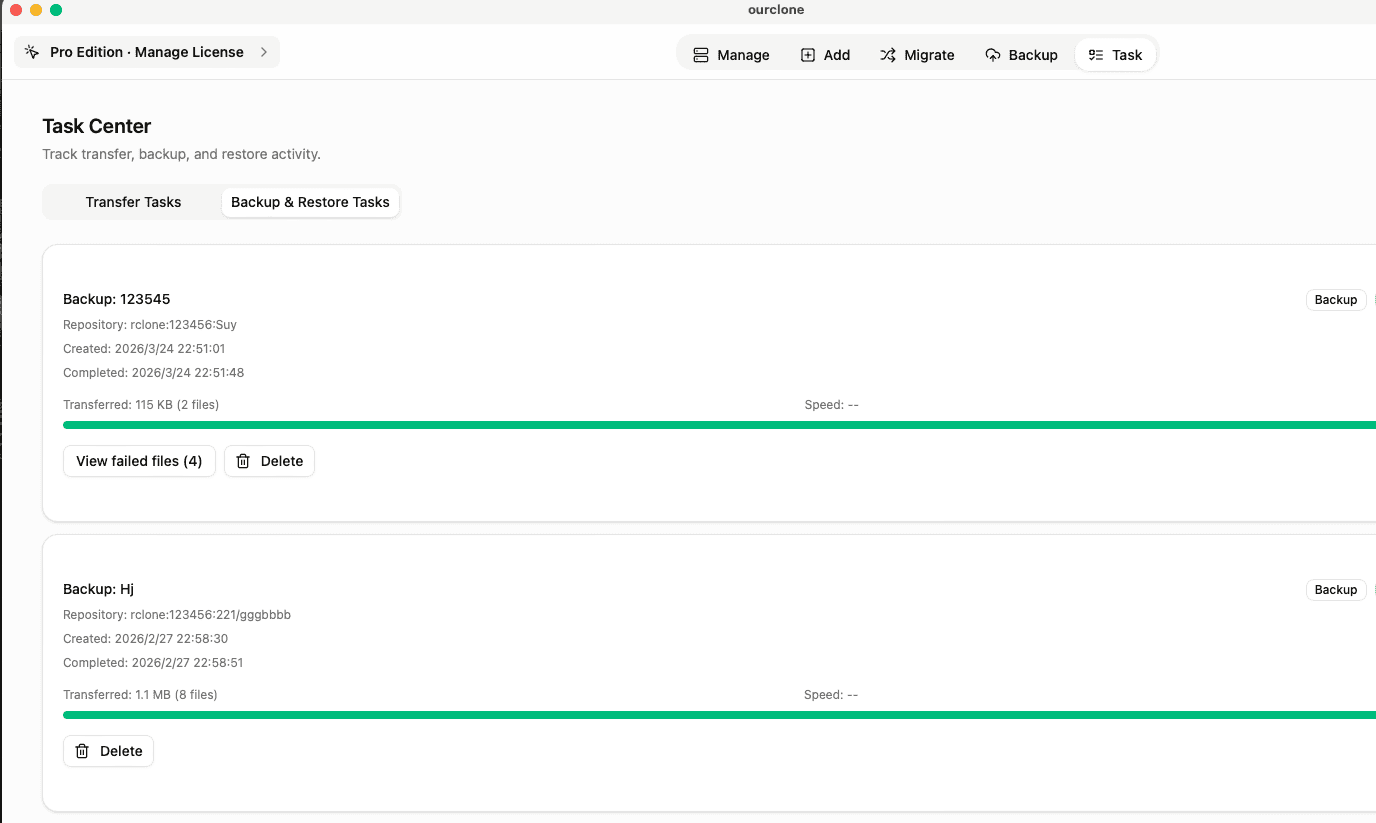
📊 Track Backup Progress Easily – Go to the
Taskpanel in OurClone to see how things are moving. The app encrypts everything locally and uploads in blocks, making large transfers resilient — you can pause and resume anytime without losing progress. -
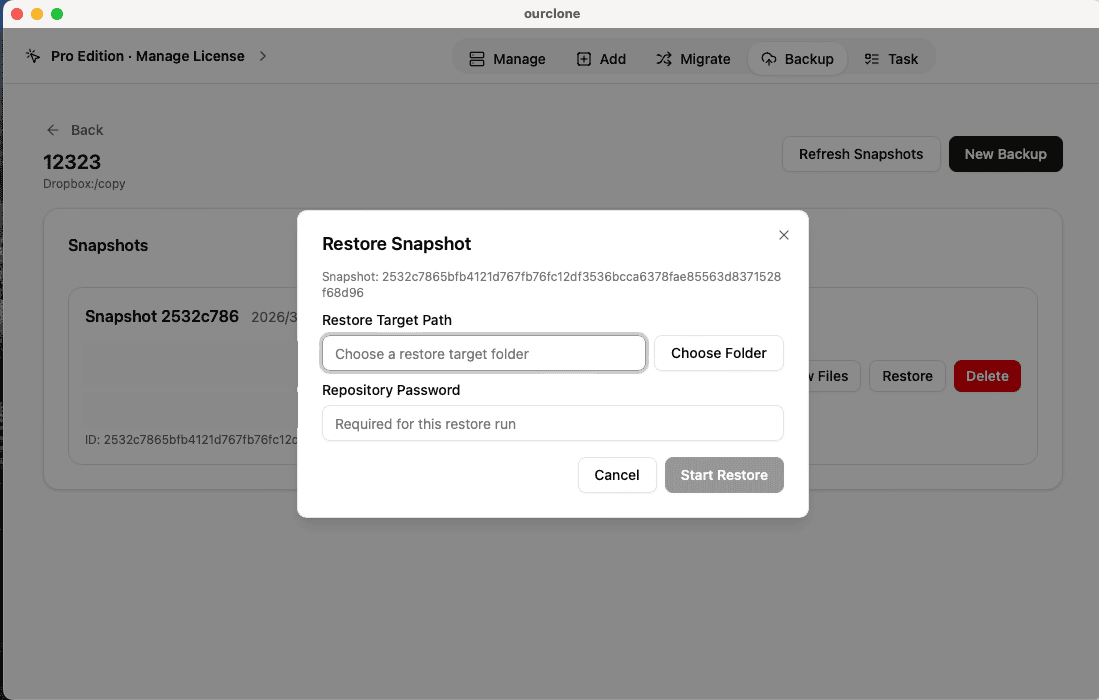
🔄 Restore Files on Demand – To recover data, open your
pCloud backup repository, pick the version you need, click
Restore, and enter your encryption password. You can recover files to their original location or send them to a different folder — the full structure is retained.

Thanks to OAuth 2.0 and OurClone’s local encryption and smart retry logic, backing up to pCloud becomes effortless and secure. Whether you’re backing up your daily work or preparing for disaster recovery, you’ll know your data is safe, encrypted, and always recoverable — no matter what happens to your Mac.
How to Confirm Your Backup in OurClone
After backing up your macOS folders to pCloud using OurClone, it’s smart to verify that the job completed correctly. OurClone provides clear status indicators and detailed logs—so you’re never left guessing whether your files made it to the cloud or not.
-
📄 Review Task Completion Details – Open the
Taskpanel and check theBackup Tasklist. If your backup succeeded, you’ll see a green success badge. Errors like connectivity issues or file permission denials will show up in red for quick troubleshooting. - 🧩 Check for Skipped or Unreadable Files – If any files were skipped—because they were in use, unreadable, or contained unsupported characters—OurClone will flag them individually. You can address these and re-run the backup without starting over.
- 📜 Scan the Full Log Output – Every backup session comes with a timestamped log showing file-level activity. You’ll see which files were uploaded, what was skipped, and whether hashes matched after upload — a great way to double-check that key documents made it into your pCloud repository.
- 🔐 Verify Encrypted Backup Integrity – OurClone encrypts your data before it ever touches pCloud. The repository is locked with your unique password — without it, the contents remain unreadable. This guarantees that only you have access, even if someone accesses your pCloud account.
Monitor Scheduled Backup Tasks
Set-it-and-forget-it backups only work when you check in occasionally. Visit OurClone periodically to make sure your pCloud sync jobs are still running as expected. Things like expired OAuth tokens, renamed folders, or permission revocations can silently stop the backup process if not addressed.
Perform a Test Restore
Run a small-scale restore test before you really need to. Choose a single folder from your pCloud backup, restore it to a different location, and verify the files open properly. This confirms both the health of your backup and that your decryption password is correct and accessible.